
Linux Tutorial – Puntata 12
di jolek78
Care/i fruitrici e fruitori del blog, in questi post – ogni domenica mattina – si parlerà del sistema operativo GNU/Linux e degli strumenti per utilizzarlo al massimo delle potenzialità. Cercheremo di spiegare come funziona, cosa è il kernel, come costruirsi una vpn, come settare un firewall e giocare col terminale, usare adb e altro. Se il capitalismo della sorveglianza ci vuole passivi consumatori-consumatrici di servizi noi si risponde con un po’ di “cultura informatica” e un MARAMEO (quasi affettuoso). Buona lettura!
![]()
Bentornati a tutti cari lettori del blog. Per qualche puntata ancora saremo bloccati sul FHS per esplorare il contenuto delle directory. Dopo aver centrato la nostra attenzione per tre puntate sulla /dev, ora finalmente ci spostiamo alla successiva che e’ la /etc, che e’ l’acronimo di etcetera, oppure meglio di editable text configuration. In buona sostanza, all’interno di questa directory sono conservati tutti i file di configurazione, di norma con l’esternsione .conf, i vecchi script per far partire o per interrompere i demoni del sistema all’interno di /init, la copia carbone delle /home directory all’interno di /skel, i file di /netplan che in sostanza su ubuntu determinano lo stato delle vostre interfacce di rete, e tanta altra bella roba. Connettetevi alla vostra macchina virtuale, aprite la console e iniziamo.
/ETC
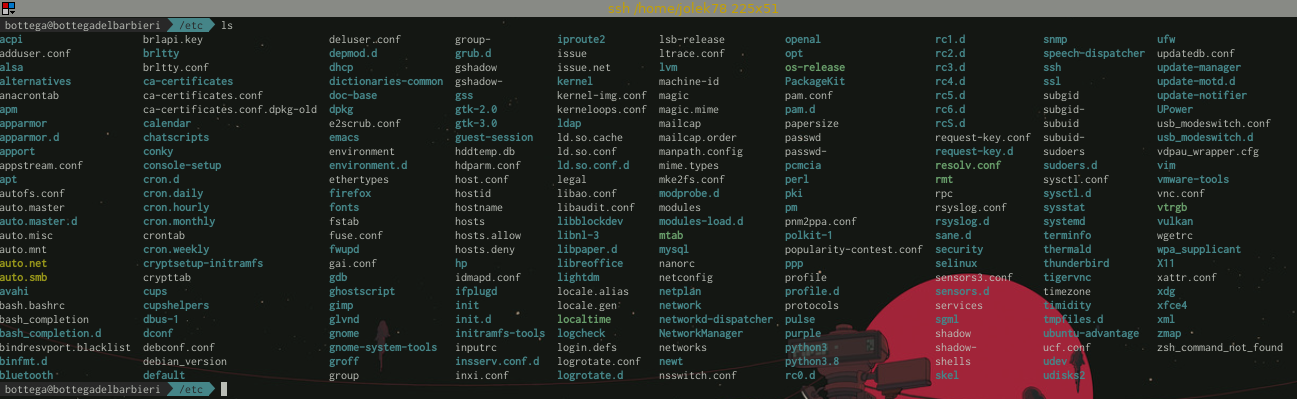
Come ci siamo detti in precedenza, qui sono collocati tutti i file di configurazione che stabiliscono le proprietà’ di alcuni programmi che vengono utilizzati dalla nostra distribuzione.
bottega@bottegadelbarbieri /etc ls -lha |grep .conf -rw-r--r-- 1 root root 3.0K Feb 9 18:48 adduser.conf -rw-r--r-- 1 root root 769 Jan 18 2020 appstream.conf -rw-r--r-- 1 root root 15K Jun 3 2020 autofs.conf -rw-r--r-- 1 root root 27K Mar 3 2020 brltty.conf -rw-r--r-- 1 root root 6.5K Feb 9 18:50 ca-certificates.conf -rw-r--r-- 1 root root 5.6K Feb 9 18:49 ca-certificates.conf.dpkg-old drwxr-xr-x 3 root root 4.0K Feb 9 18:52 dconf -rw-r--r-- 1 root root 2.9K Aug 3 2019 debconf.conf -rw-r--r-- 1 root root 604 Sep 15 2018 deluser.conf -rw-r--r-- 1 root root 685 Feb 14 2020 e2scrub.conf -rw-r--r-- 1 root root 280 Jun 20 2014 fuse.conf -rw-r--r-- 1 root root 2.6K Feb 1 2020 gai.conf -rw-r--r-- 1 root root 5.0K Aug 21 2019 hdparm.conf -rw-r--r-- 1 root root 92 Dec 5 2019 host.conf -rw-r--r-- 1 root root 206 Apr 6 2019 idmapd.conf drwxr-xr-x 2 root root 4.0K Apr 25 05:53 insserv.conf.d -rw-r--r-- 1 root root 71 Feb 9 2017 inxi.conf -rw-r--r-- 1 root root 110 Feb 27 08:58 kernel-img.conf -rw-r--r-- 1 root root 1.3K Dec 1 2017 kerneloops.conf -rw-r--r-- 1 root root 34 Apr 14 2020 ld.so.conf drwxr-xr-x 2 root root 4.0K Feb 9 18:50 ld.so.conf.d -rw-r--r-- 1 root root 27 Jan 18 2018 libao.conf -rw-r--r-- 1 root root 191 Feb 18 2020 libaudit.conf -rw-r--r-- 1 root root 533 Jan 21 2019 logrotate.conf -rw-r--r-- 1 root root 15K Feb 1 2019 ltrace.conf -rw-r--r-- 1 root root 5.1K Feb 25 2020 manpath.config -rw-r--r-- 1 root root 808 Feb 14 2020 mke2fs.conf -rw-r--r-- 1 root root 767 Dec 27 2019 netconfig -rw-r--r-- 1 root root 542 Feb 9 19:03 nsswitch.conf -rw-r--r-- 1 root root 552 Dec 17 2019 pam.conf -rw-r--r-- 1 root root 7.5K Feb 9 19:03 pnm2ppa.conf -rw-rw-r-- 1 root root 350 Feb 27 08:58 popularity-contest.conf -rw-r--r-- 1 root root 1.9K Oct 20 2019 request-key.conf lrwxrwxrwx 1 root root 39 Feb 27 08:56 resolv.conf -> ../run/systemd/resolve/stub-resolv.conf -rw-r--r-- 1 root root 1.4K Feb 11 2020 rsyslog.conf -rw-r--r-- 1 root root 11K Nov 6 2019 sensors3.conf -rw-r--r-- 1 root root 2.3K Feb 13 2020 sysctl.conf -rw-r--r-- 1 root root 1.3K Dec 14 2018 ucf.conf -rw-r--r-- 1 root root 556 Jul 16 2019 updatedb.conf -rw-r--r-- 1 root root 1.5K Feb 10 2020 usb_modeswitch.conf -rw-r--r-- 1 root root 8.4K Dec 21 2019 vnc.conf -rw-r--r-- 1 root root 642 Sep 24 2019 xattr.conf
ADDUSER – DELUSER || /etc/adduser – /etc/deluser
Per esempio se andiamo a guardare il file di configurazione di adduser (vi ricordate quando abbiamo aggiunto un utente bottega_test vero?) ci sono vari parametri che ci danno risposta ad alcune domande:
bottega@bottegadelbarbieri /etc cat adduser.conf |grep -v "#" DSHELL=/bin/bash DHOME=/home GROUPHOMES=no LETTERHOMES=no SKEL=/etc/skel FIRST_SYSTEM_UID=100 LAST_SYSTEM_UID=999 FIRST_SYSTEM_GID=100 LAST_SYSTEM_GID=999 FIRST_UID=1000 LAST_UID=59999 FIRST_GID=1000 LAST_GID=59999 USERGROUPS=yes USERS_GID=100 DIR_MODE=0755 SETGID_HOME=no QUOTAUSER="" SKEL_IGNORE_REGEX="dpkg-(old|new|dist|save)"
– quale shell verra’ usata nella creazione dell’utente? /bin/bash
– dove verra’ collocata la direcotry principale del nuovo utente? /home
– dove verra’ salvato il backp della home directory? /etc/skel
– quale numero verra’ assegnato al system uid e gid? da 100 a 999
– quale numero verra’ assegnato al uid e gid? da 100 a 999
– quali saranno i permessi assegnati alla directory? 0755
etc…
Se andiamo a guardare deluser – utility per rimuovere gli utenti – vedremo che
bottega@bottegadelbarbieri /etc cat deluser.conf |grep -v "#" REMOVE_HOME = 0 REMOVE_ALL_FILES = 0 BACKUP = 0 BACKUP_TO = "." ONLY_IF_EMPTY = 0 EXCLUDE_FSTYPES = "(proc|sysfs|usbfs|devpts|tmpfs|afs)
Se ci fate caso, sia per REMOVE_HOME, REMOVE_ALL_FILES che BACKUP abbiamo il valore 0, il che vuol dire che l’utility manterra’, senza fornire parametri aggiuntivi, sia la home sia i files sia il backup. Ergo, per rimuovere un utente e la sua home directory e i suoi file interpelliamo l’help:
bottega@bottegadelbarbieri /etc deluser --help deluser USER remove a normal user from the system example: deluser mike --remove-home remove the users home directory and mail spool --remove-all-files remove all files owned by user --backup backup files before removing. --backup-to <DIR> target directory for the backups. [...]
Infatti, senza opzioni, ecco cosa succede se proviamo a rimuovere bottega_test:
bottega@bottegadelbarbieri /etc sudo deluser bottega_test [sudo] password for bottega: Removing user `bottega_test' ... Warning: group `bottega_test' has no more members. Done. bottega@bottegadelbarbieri /etc ls -lha /home/ total 16K drwxr-xr-x 4 root root 4.0K Apr 29 17:29 . drwxr-xr-x 20 root root 4.0K Apr 25 07:26 .. drwxr-xr-x 22 bottega bottega 4.0K May 22 09:37 bottega drwxr-xr-x 4 1001 1001 4.0K Apr 29 18:13 bottega_test
HOSTNAME || /etc/hostname
Dentro hostname avremo il nome che abbiamo assegnato alla nostra macchina virtuale:
bottega@bottegadelbarbieri /etc cat hostname bottegadelbarbieri
RELEASE || /etc/os-release
Dentro os-release le proprieta’ e la versione della nostra distribuzione:
bottega@bottegadelbarbieri /etc cat os-release NAME="Ubuntu" VERSION="20.04.2 LTS (Focal Fossa)" ID=ubuntu ID_LIKE=debian PRETTY_NAME="Ubuntu 20.04.2 LTS" VERSION_ID="20.04" HOME_URL="https://www.ubuntu.com/" SUPPORT_URL="https://help.ubuntu.com/" BUG_REPORT_URL="https://bugs.launchpad.net/ubuntu/" PRIVACY_POLICY_URL="https://www.ubuntu.com/legal/terms-and-policies/privacy-policy" VERSION_CODENAME=focal UBUNTU_CODENAME=focal
FSTAB || /etc/fstab
Dentro fstab le configurazioni del nostro filesystem – lo abbiamo visto quando parlavamo delle partizioni:
bottega@bottegadelbarbieri /etc cat fstab # /etc/fstab: static file system information. # # Use 'blkid' to print the universally unique identifier for a # device; this may be used with UUID= as a more robust way to name devices # that works even if disks are added and removed. See fstab(5). # # <file system> <mount point> <type> <options> <dump> <pass> /dev/mapper/vgxubuntu-root / ext4 errors=remount-ro 0 1 # /boot was on /dev/sda5 during installation UUID=efc51c8f-4202-458a-9210-239d075aee17 /boot ext4 defaults 0 2 # /boot/efi was on /dev/sda1 during installation UUID=880E-018C /boot/efi vfat umask=0077 0 1 /dev/mapper/vgxubuntu-swap_1 none swap sw 0
SUDOERS || /etc/sudoers
Dentro sudoers le proprieta’ di root che assegna il comando sudo:
bottega@bottegadelbarbieri /etc sudo cat sudoers |grep -v "#" Defaults env_reset Defaults mail_badpass Defaults secure_path="/usr/local/sbin:/usr/local/bin:/usr/sbin:/usr/bin:/sbin:/bin:/snap/bin" root ALL=(ALL:ALL) ALL %admin ALL=(ALL) ALL %sudo ALL=(ALL:ALL) ALL
Questi sono soltanto alcuni esempi che vi fanno vedere l’importanza di questa tipologia di file. Sapendo cosa andare a toccare, possiamo letteralmente far fare al nostro sistema qualsiasi cosa. Due piccole aggiunte, che ci serviranno quando finiremo l’analisi del FHS. Dedicheremo una puntata ad ognuno di questi programmi:
GRUB || /etc/grub/
bottega@bottegadelbarbieri /etc ls -lha grub.d/ total 148K drwxr-xr-x 2 root root 4.0K Feb 27 09:03 . drwxr-xr-x 143 root root 12K May 15 18:35 .. -rwxr-xr-x 1 root root 11K Jan 13 14:12 00_header -rwxr-xr-x 1 root root 6.2K Jan 13 13:53 05_debian_theme -rwxr-xr-x 1 root root 18K Jan 13 14:12 10_linux -rwxr-xr-x 1 root root 42K Jan 13 14:12 10_linux_zfs -rwxr-xr-x 1 root root 13K Jan 13 14:12 20_linux_xen -rwxr-xr-x 1 root root 2.0K Aug 18 2020 20_memtest86+ -rwxr-xr-x 1 root root 12K Jan 13 14:12 30_os-prober -rwxr-xr-x 1 root root 1.4K Jan 13 14:12 30_uefi-firmware -rwxr-xr-x 1 root root 214 Jan 13 14:12 40_custom -rwxr-xr-x 1 root root 216 Jan 13 14:12 41_custom -rw-r--r-- 1 root root 483 Jan 13 14:12 README bottega@bottegadelbarbieri /etc
In questa directory sono conservati i file di configurazione di grub, che e’ sostanzialmente il boot manager che decide quale sistema operativo, versione del kernel, o il famoso sigle user mode, far partire all’avvio. Tenete pero’ a mente che il file principale questa volta – spiegheremo il perché – e’ contenuto in /boot e non in /etc:

bottega@bottegadelbarbieri /etc cat /boot/grub/grub.cfg |more
[...]
menuentry 'Ubuntu' --class ubuntu --class gnu-linux --class gnu --class os $menuentry_id_option 'gnulinux-simple-52895bce-6681-4ab1-85f4-8c1883aff472' {
recordfail
load_video
gfxmode $linux_gfx_mode
insmod gzio
if [ x$grub_platform = xxen ]; then insmod xzio; insmod lzopio; fi
insmod part_msdos
insmod ext2
set root='hd0,msdos5'
if [ x$feature_platform_search_hint = xy ]; then
search --no-floppy --fs-uuid --set=root --hint-bios=hd0,msdos5 --hint-efi=hd0,msdos5 --hint-baremetal=ahci0,msdos5 efc51c8f-4202-458a-9210-239d075aee17
else
search --no-floppy --fs-uuid --set=root efc51c8f-4202-458a-9210-239d075aee17
fi
linux /vmlinuz-5.8.0-50-generic root=/dev/mapper/vgxubuntu-root ro quiet splash $vt_handoff
initrd /initrd.img-5.8.0-50-generic
[...]
CRONTAB || /etc/crontab
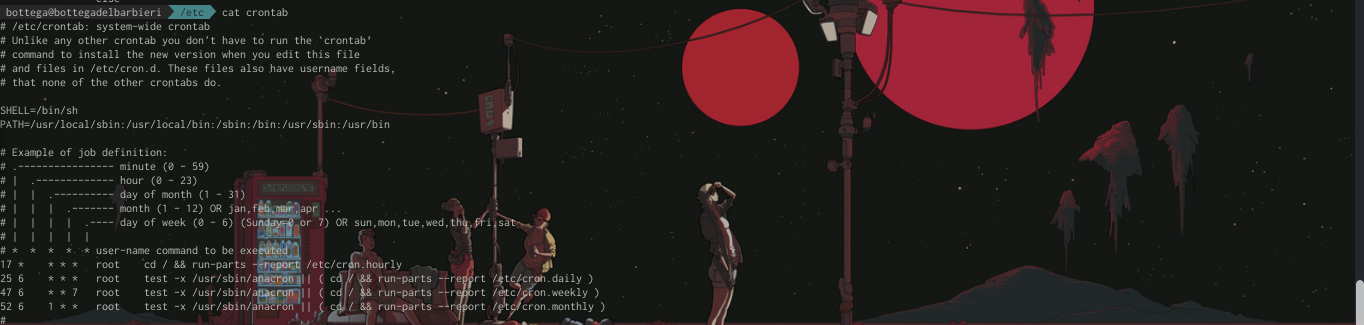
In questo file sono conservati gli esempi di come creare un task automatico su linux, come, per esempio un backup. Piccolo spoiler delle prossime puntate: per aggiungerne uno il comando da eseguire sara’ crontab -e
bottega@bottegadelbarbieri /etc cat crontab # /etc/crontab: system-wide crontab # Unlike any other crontab you don't have to run the `crontab' # command to install the new version when you edit this file # and files in /etc/cron.d. These files also have username fields, # that none of the other crontabs do. SHELL=/bin/sh PATH=/usr/local/sbin:/usr/local/bin:/sbin:/bin:/usr/sbin:/usr/bin # Example of job definition: # .---------------- minute (0 - 59) # | .------------- hour (0 - 23) # | | .---------- day of month (1 - 31) # | | | .------- month (1 - 12) OR jan,feb,mar,apr ... # | | | | .---- day of week (0 - 6) (Sunday=0 or 7) OR sun,mon,tue,wed,thu,fri,sat # | | | | | # * * * * * user-name command to be executed 17 * * * * root cd / && run-parts --report /etc/cron.hourly 25 6 * * * root test -x /usr/sbin/anacron || ( cd / && run-parts --report /etc/cron.daily ) 47 6 * * 7 root test -x /usr/sbin/anacron || ( cd / && run-parts --report /etc/cron.weekly ) 52 6 1 * * root test -x /usr/sbin/anacron || ( cd / && run-parts --report /etc/cron.monthly )
Ora pero’ tocca a voi. Buona esplorazione!
Alla prossima settimana!
jolek78
| >> | Indice | << |
| Puntata 11 | < > | Puntata 13 |
Il logo “Tux Linux” e’ stato realizzato e distribuito dall’artista deiby-ybied su Deviantart in licenza Creative Commons BY-NC-SA 3.0
